Homemade Vegetable Stock Update

Tags

, , , , , ,

I originally shared my guide to making homemade vegetable stock last spring, which walks through some different approaches to ingredients and techniques. There are lots of ways to make stock to your personal liking, so I hope you’re doing it and enjoying it as much as I do!

Now that I’m in the habit of making my own stock, I use a lot more. Within the last month, I went through about 6 quarts in various recipes including balsamic marinated beets, minestrone soup, fennel lentil & sausage, and quinoa.

Sidebar: If you follow the instructions on your bag of quinoa, don’t. They will tell you to use the same ratio of liquid to grain as you would with rice, 2:1. This makes a mushy mess. Try reducing the liquid by a third to a half cup, per cup of grain. I promise you’ll be much happier with the result. I make a pot of quinoa almost every week and use it throughout to sprinkle on salads, or a substitute for rice in Mexican and Asian dishes, or add to breakfast scrambles. Because it’s a little drier this way, it absorbs the flavors of whatever it’s with. And because I make it with stock instead of water, it contributes more complexity to the flavor as well.

What took homemade vegetable stock from an occasional thing to a regular habit for me was freezing vegetable scraps. And I’m not super fancy about it either. I just use big freezer bags. Whenever I’m cooking I get the bag out and add more scraps. They accumulate for a couple weeks and then I make a pot of stock.

As a result, there’s much less waste coming out of our kitchen. If I know something is going to spoil before I can use it – like if we’re leaving town for the weekend – I just add it to the scrap bag. I don’t waste my time with the tiny inner cloves of garlic, throw away the bottom half of every fresh herb bunch, or feel guilty about not using mushroom stems in recipes. All that stuff gets frozen and turned into delicious stock. Then composted.

But the stock itself will spoil so…I freeze that too. Once cooled, I put it in my favorite extra-large ice cube trays, and then transfer the frozen cubes of stock into, you guessed it, another big freezer bag. I always have pre-measured stock ready to use. Super easy, thrifty, and waste conscious.

Advertisement

Carrot Cake Overnight Oatmeal

Tags

, , , , , ,

IMG_6543

My friend Katie brought the most amazing thing to work one morning. It smelled like warm carrot cake but it looked like a healthy bowl of oatmeal. Plus, she told me it’s mostly vegetables, it’s vegan, and she made it overnight in her crock pot. Guys. Someone needs to tell me about these things sooner. I’m counting on you.

She pointed me here for the recipe, which is one blogger’s test kitchen post of a recipe from The Vegan Slow Cooker, which is now on my wish list of books because it looks like a work of pure genius.

I’ve adapted it quite a bit, so if you compare my version to the original you’ll get a good idea of how flexible this recipe is. Here’s how I make it…

Ingredients:

  • 2-3 large carrots
  • 1 medium zucchini
  • 1 green apple
  • 1 small sweet potato
  • 1 cup steel cut oats*
  • 1 quart (box) vanilla flavored nut milk (I use Coconut Dream)
  • 1 tsp salt
  • .25 cup maple syrup (more if you like it a little sweeter)
  • 1 tbsp vanilla
  • 1 tbsp cinnamon
  • 1 tsp nutmeg
  • .5 tsp clove
  • .5 cups chopped walnuts
  • .25 cups raisins

Instructions:

  1. Optional: cover the bottom a crock pot with a thin layer of grape seed oil, or spray interior with cooking oil spray (it marginally helps with sticking, I usually skip)
  2. Spread oats in bottom of crock pot
  3. Grate the carrots, zucchini, apple and sweet potato (this is where a food processor comes in really handy) and pile on top of oats
  4. Sprinkle all the spices, salt, syrup and vanilla over the grated veggies
  5. Pour the nut milk over everything
  6. Set crock pot on low overnight, or for at least 6 hours
  7. Wake up to the most amazing smell
  8. Stir in walnuts and raisins, adjust thickness with additional nut milk if necessary

You’re going to want to stir it – go ahead! I’ve done it both ways and it doesn’t seem to matter. I find that mine burns just a little around one area of my crock pot no matter what, so I lose about 5% of the recipe. But all crock pots are different. I made this at my parents’ house and found that it needed more time to get the same result – closer to 9 hours. Like I said, it’s a very forgiving recipe so you’ll still enjoy the outcome as you learn what works best for you.

*Oat Note: This ratio of ingredients works perfectly for me with the steel cut oats you get in a bulk bin. When I bought a big bag of Bob’s Red Mill Quick Cooking Steel Cut Oats, I found that I had to add a quarter to a third of a cup more oats to get the same consistency. Bob’s also carries gluten free steel cut oats.


Buffalo Cauliflower

Tags

, , , , , ,

Buffalo Cauliflower

Let’s be honest. You miss certain things when you give up meat. People always talk about bacon, and of course bacon is tasty. But for me, nothing will ever replace the Mussaman Curry Beef at Indochine, my favorite restaurant in Tacoma. The tofu version pales in comparison. Or the Braised Carnitas at Matador, with that wonderful orange and savory profile. I can’t imagine a substitute. Literally my mouth watered typing that. BUT I’m totally happy with my choice. Let’s move on…

Sometimes, what I miss is not actually the meat, but something else about the eating experience. That is definitely the case for buffalo wings. The chicken wings themselves are an awkward, greasy, boney mess. Never really liked them. But, oh the buffalo sauce. When you think sports, when you think relaxing with beers, you think buffalo wings. It’s almost ritualized, the perfect combination of flavor and eating occasion. And I was craving it something fierce during the playoffs this year.

Great news: cauliflower buffalo bites. Thank you, PETA. You just do so much good in this world.

These are amazing, and I make them more frequently than I would like to admit. Here’s the original recipe. And here are my preferred modifications.

IMG_6544

Ingredients:

  • half of a large cauliflower head, broken into bite-sized florets
  • 1 cup flour (I just use all purpose, bet any kind would work to be GF)
  • 1 tbsp garlic powder
  • 1 tbsp onion powder
  • 1.25 cups regular unsweetened nut milk (my preference is Coconut Dream)
  • .5 cups buffalo sauce (Frank’s Red Hot is the classic, I actually think Tabasco’s version is better if you can find it)
  • 1 tbsp olive oil
  • Grape seed oil spray or other high temp cooking oil

Instructions:

  1. Preheat the oven to 450°
  2. Line a cookie sheet with foil or other high temp liner and spray with grape seed oil
  3. Mix the dry ingredients together in a large bowl, then add the milk and stir until the lumps are out
  4. Dip florets in the batter and arrange on cookie sheet – you might want to adjust the amount of milk in the batter to get your ideal consistency
  5. Bake for 20-25 minutes, flipping half way through
  6. In the meantime, mix buffalo sauce and olive oil in a medium bowl
  7. When the battered florets are done, toss in the buffalo sauce mixture and serve right away
  8. Celery sticks and blue cheese dressing are the classic accompaniment, but I never bother – too good already!

Amazing Vegan Gravy

Tags

, , , , ,

image

Reposting this for your Thanksgiving because this gravy truly is amazing! I made it for Thanksgiving with my boyfriend’s family last year and everybody politely tried some at the beginning of the meal. But this was requested instead of the traditional turkey gravy for second helpings.

If you haven’t ever used chia seeds, you’re in for a treat. They look like poppy seeds when dry, but absorb 10 times their weight in liquid to act as a thickening agent. I also use them in chia seed tea.

I found the recipe from RuthsFoods and she has a video tutorial worth watching. Enjoy!

Ingredients and Instructions: 

image

Clockwise from green bowl:

  • 1/2 white onion, minced
  • 1/2 cup vegetable broth + 1/2 cup for later to adjust thickness as needed
  • 2 tbsp chia seeds
  • 1-2 tbsp miso
  • 1/4 tsp ground black pepper
  • 1/4 tsp Celtic sea salt
  • 1/4 tsp powdered thyme (or other seasoning if you prefer)
  • Sprig of rosemary (again, or other as you like)
  • 2 tbsp oil (I’m using grape seed)
  • 3 tbsp nutritional yeast

In a large skillet, saute onions in oil until they turn translucent.

Add the nutritional yeast, salt, pepper and seasonings (thyme and rosemary, or whatever you choose) and stir so that they can absorb all the oil. Let this saute, stirring, for 5 minutes.

image

Add the broth and chia seeds and mix well to avoid clumps. I like to mix the chia seeds into the broth before beginning so the have several minutes to plump up. At this point, reduce the heat to low and give the chia seeds time to absorb, stirring occasionally, for 5-10 minutes.

Adjust the thickness with the additional broth. I typically stir in another 1/4 cup or more, slowly so I can gauge. The chia will continue to thicken it, so make it just a little thinner than you really want.

Remove from heat and add the miso, mashing to fully incorporate.

Voila! 

The World’s Easiest Pasta Sauce (is also extremely delicious)

Tags

, , , , , , ,

World's Easiest Pasta Sauce

My friend Rachel, who is an amazing cook, whipped up this marinara pasta sauce for me one day from scratch in the same time it took to boil water and cook the pasta. No secret recipe simmering on the stove for hours. No careful balance of sugar. Just a can of tomatoes and a few ingredients you can count on one hand. And it was the freshest, most delicious pasta sauce I’ve ever tasted!

The magic is in the simplicity and the specific type of tomato. San Marzano tomatoes are a variety of plum tomatoes which look like Romas but are even more elongated. They have thicker flesh, fewer seeds and are less acidic than other varieties, making them the idea sauce tomatoes. You can find several brands of San Marzanos at higher end grocery stores. This is the brand I use:

San Marzano tomatoes

Rachel credits Lidia Matticchio Bastianich with this recipe, and I found  this one here which is very similar. But the fresh basil, or any Italian herb, is totally optional in my experience.

World's Easiest Pasta Sauce

Ingredients (to serve 2):

  • 2 tbsp Extra Virgin Olive Oil
  • .25 tsp Red Pepper Flakes
  • 3 to 5 Garlic Cloves, diced or thinly sliced
  • 1 can (28 oz) San Marzano Whole Peeled Tomatoes
  • Salt and Pepper to taste

Instructions:

  1. Over medium heat in a medium sauce pan, heat the oil and add pepper flakes and some fresh ground pepper. Season the oil for a minute.
  2. Add the garlic and season the oil for another minute.
  3. Add the San Marzano tomatoes and use a potato masher to mash them and stir all ingredients. Careful, they can squirt.
  4. Add a little of the tomato juice from the can and/or additional oil if you wish.
  5. Reduce heat and simmer until the oil separates (about the time your pasta is ready!) but stir and continue mashing the tomatoes occasionally.
  6. Season with additional pepper and some salt. If you want to add fresh Italian herbs, they make a perfect garnish.

Mashed Cauliflower “Fauxtatoes”

Tags

, , , , , ,

Mashed Cauliflower

There are a lot of reasons you might want to substitute cauliflower for potatoes when you want a mashed side. Certainly the nutritional value of cauliflower is significant:

  • Potatoes are almost 4x more caloric than cauliflower.
  • They are comparable in fiber, but potatoes are 4x higher in carbs.
  • Cauliflower is a very good source of Vitamin C – one cup has 77% of your daily value.
  • While both potatoes and cauliflower score above 100 on amino acids (meaning they are complete or high-quality proteins) the caloric ratio of cauliflower is 19% versus 7% for potatoes.
  • Cauliflower has a significantly lower glycemic load (2 versus 10 per 100 grams) so this is a much better choice for maintaining healthy blood sugar.
  • Cauliflower is mildly anti-inflammatory (Inflammatory Factor score of 18, higher is better) while potatoes are mildly inflammatory (IF score of -60).

But for me the flavor and texture are big selling points, making mashed cauliflower more than a mere substitution. It’s no compromise in my mind, it’s a delicious side dish in its own right.

You can double this recipe to make a big batch using the whole head of cauliflower, or do what I do: cut out the “middle half” in two half-inch thick slices and save for cauliflower steaks.

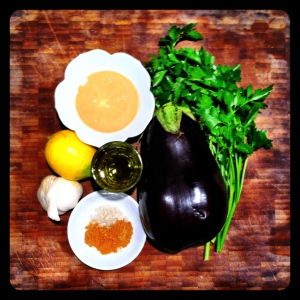
Mashed Cauliflower Ingredients

Ingredients:

  • Half head cauliflower
  • 2 cups vegetable stock
  • 2 tbsp olive oil + more to drizzle
  • 2 to 3 cloves garlic (we love it, you should adjust accordingly!)
  • Celtic sea salt and pepper to taste

Instructions:

  1. Break cauliflower into medium-size florets.
  2. Simmer in stock for approximately 10 minutes until tender.
  3. Strain but reserve some cooking liquid to adjust texture later if necessary.
  4. Place cauliflower, garlic, olive oil, salt and pepper in a food processer and blend until desired texture.
  5. Serve with an additional drizzle of olive oil and sprinkle of pepper if desired.

Roasted Garlic Baba Ganoush

Tags

, , , , , , , ,

Roasted Garlic Baba Ganoush

Baba Ganoush is essentially hummus made with roasted eggplant instead of garbanzo beans. But the flavor is distinct and the two dishes pair well together, with the same types of veggies and bread for dipping.

You can roast the eggplant and garlic in the oven, but if you’re firing up the grill for other things (try brussel sprouts or sweet potatoes!), take advantage of that flame for a better flavor that’s also energy efficient.

Roasted Garlic Baba Ganoush

Ingredients:

  • 1 large eggplant
  • 1 to 2 garlic bulbs
  • .5 cups chopped parsley
  • Juice of 1 lemon
  • .25 cups extra virgin olive oil + more for garlic
  • .25 cups tahini
  • .25 tsp Celtic sea salt
  • .25 tsp cumin powder

Instructions:

  1. Preheat grill to approximately 350° or medium heat.
  2. Double wrap garlic bulbs in tin foil with a sprinkle of olive oil and place on grill.
  3. Wash eggplant and remove leaves but not the stem, then pierce several times with a knife. Place on grill, turning every 5 to 10 minute to char all sides. Leave on grill approximately 20 to 30 minutes or until skin is fully charred and meat is soft.
  4. Remove garlic and eggplant from grill and allow both to cool enough to handle.
  5. Peel off skin and remove stem from eggplant.
  6. Cut off top of garlic blubs and squeeze out roasted garlic cloves – should be mushy.
  7. Place all ingredients in a food processor until smooth.
  8. Refrigerate for at least an hour. Will keep in refrigerator for several days.
  9. Garnish with additional olive oil when serving if you like.

Herbed Popcorn

Tags

, , , ,

Herbed Popcorn

Popcorn night was a family tradition for me growing up. Every Sunday night, we would make a big bowl of popcorn plus a variety platter of fruits and cheeses. That was dinner and we would sit together on the floor in front of the TV watching the Muppet Show. Later, when that went off the air, we rented movies. But the classic popcorn night for me will always include Pigs in Space, the Swedish Chef, and that “we’ve got crab legs” jingle during commercials. It’s a wonderful memory, so I’ve continued the tradition with my own spin: less frequency but more “grown up” nibbles.

The “fruit and cheese” portion of the meal can be anything you want for munchies on the side – nuts, veggies, marinated olives, etc.

Munchies

I also plus-up my popcorn with olive oil, garlic salt and thyme instead of butter and salt. It’s healthier (vegan, if that’s important to you) and more fun. I love it with nutritional yeast instead of thyme for a cheddar-like flavor, but that’s not as popular with other members in my household.

My parents have an air popper, but I never got one. Instead, I use my big stock pot over medium heat on the stove. Works great and there’s one less small appliance in my cupboards.

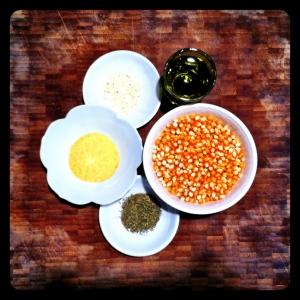
Herbed Popcorn Ingredients

Ingredients:

  • 1 cup popcorn kernels
  • 2 tbsp grape seed oil
  • .5 cups olive oil
  • 1 tsp garlic salt
  • 1 tsp dried thyme OR 2 tbsp nutritional  yeast

Instructions:

  1. Heat the kernels over medium in grape seed oil on the stove. After a few minutes they’ll start popping. Listen for the popping to slow down until it’s almost stopped and remove from heat.
  2. Immediately transfer to a large bowl and cool the stock pot under cold water.
  3. In batches, add the popcorn back into pot.
  4. Top with olive oil, garlic salt and dried thyme/nutritional yeast.
  5. Shake vigorously with the lid on so all the popcorn is evenly seasoned.

Grilled Brussel Sprouts

Tags

, , , ,

Grilled Brussel Sprouts

Grilled veggies are one of the joys of summer, as well as very filling. A few different veggies plus some grilled polenta or garlic/cheese bread is perfect for dinner. And it’s easy to throw together, as long as you have a grill basket.

Even if you don’t have a grill basket, you can still enjoy grilled Brussel Sprouts on skewers. They have become one of my new favorite vegetables to grill, probably because they have such a bad reputation that it’s especially delightful when they’re done right. Grilling enhances the nuttiness of these tiny cabbages and this basic marinade caramelizes on the grill for a bright and complex profile.

Ingredients:

  • Juice of 1 lemon
  • Equal part olive or grape seed oil
  • 1 tbsp Montreal Steak Seasoning

This pre-mixed steak seasoning is easy to find and covers pretty much all of your bases: salt, pepper, paprika, garlic, red pepper, and dill seed. This simple marinade works wonderfully on…pretty much everything else too. It’s especially good on asparagus and on thick cut grilled onion rings.

Grilled Sweet Potatoes

Tags

, , , ,

Grilled Sweet Potatoes

Love those sweet potatoes! And they’re great all year round with recipes like this one. In addition to being a delicious and filling side dish, they pick up grill marks beautifully so they look as good they taste.

Ingredients:

  • 2 large sweet potatoes
  • .25 cups grape seed or olive oil
  • 1 tbsp brown sugar
  • .5 tsp cinnamon

Instructions:

  1. Preheat grill to medium.
  2. Wash the sweet potatoes and cut on a diagonal into about half-inch thick ovals. Not necessary to peel, but your choice.
  3. Blanch the slices of sweet potato, then pat dry and let cool to the touch.
  4. In a small bowl, mix the oil, sugar and cinnamon until incorporated. You can adjust the ratios to your liking, these measurements are approximate.
  5. Toss the sweet potato slices in the oil mixture until all surfaces are evenly coated.
  6. Grill for 10-20 minutes, flipping several times to get good marks. Keep an eye on them and pull off when the texture is to your liking. Every grill is different and the time on the grill will vary depending on how much you cooked them during blanching.